How To
Choose a plumber
The best time to choose a plumber is before you experience a plumbing emergency. Unfortunately, most people facing an emergency have very little time to research a plumber. When the toilet springs a leak or the basement ceiling is wet from a broken pipe upstairs, finding help is imperative.
You can trust Service Works Plumbing!
Customer service is the provision of service to customers before, during and after a purchase. When a customer aquires our services, it is often as a result of trust. We must prove to be trustworthy not only on the product level, but service as well. We must begin to think and act in ways that seek to literally keep that customer forever!
Choose us! 303-946-2760
Licensed Plumbers protect the health of the nation.
Please ask your plumber to see his or her Plumbing License.
Garbage Disposal Smell Removal
 Tip 1 – Turning Offensive Odor into Lemonade
Cut a lemon or lime into quarters and put the quartered slices into your disposal one at a time with the cold water running and your disposal turned on. Your disposal will smell like a fresh lemonade or limeade.
Tip 2 – Vinegar and Baking Soda
Deodorize your disposal by sprinkling some baking soda from your cupboard into the disposal; just enough to cover the inside. Pour 1/2 a cup of vinegar over the soda. After an hour, return and turn on the cold water and the disposal for a few minutes.
Tip 3 – Vinegar and Ice
Fill up some ice trays with a mixture of distilled white vinegar and water. Once the vinegar cubes have frozen put a few of them into your disposal. Turn on the cold water and your disposal and grind up the ice cubes. Not only does your disposal smell better but you have sharpened the teeth of your disposal at the same time.
Sanitize a Garbage Disposal
Tip 1 – Avoid Food Build-Up
Avoid having food and garbage build up inside your disposal by disposing of your food properly. When using your disposal, always be sure to allow the water to run at full force while the food is being ground up. When water is not flowing into your disposal while food is being processed, or if it fails to run for a long enough period of time, slurry can collect on your disposal which can create bacteria and odors.
Tip 2 – Flush with Soapy Water
About once a week, fill your sink with hot, sudsy water, and turn on your disposal. This will help flush food from the disposal.
Tip 3 – Disinfect your Disposal
About once a month follow the steps in Tip 2, but fill your hot, sudsy water with 1/2 cup of chlorine bleach. If you don’t care for the odor of bleach, a commercial disinfectant will also do the job.
Protect Your Pipes
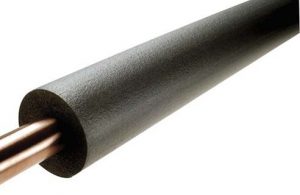 Anyone living in northern areas where temperatures get below freezing (32 degrees F) and the wind chills can reach temperatures well below zero has at one time or another experienced freezing pipes. People living in modular homes and trailers are especially prone to freezing pipes. When water freezes, it expands, causing pipes to break because the water has no place to go during expansion.
Prevention, of course, is a lot better alternative than pipe replacement. Leaving a faucet at the farthest point from the water source dripping allows movement of water in the pipe, and controls freezing. The use of heat tapes on pipes in crawl spaces helps stop freezing. Wrapping pipes with foam rubber sleeves or fiberglass insulation works well. Always insulate both hot and cold pipes.
If pipes become frozen, but have not yet burst, there are methods to follow to thaw them. Never use an open flame torch to thaw frozen pipes! This is a definite safety hazard because generally you are working in tight spaces, and fire could be the result of using an open flame torch. Instead, first attempt to thaw frozen pipes by placing a space heater as close as possible to the pipes that are frozen. Open a faucet to allow steam and ice to escape. You can also use a hair dryer to thaw pipes. If extreme caution is used, a heat gun, such as one used for removing paint, works well.
Fix Your Slow Drain in 6 Steps
Materials Needed:
- Plunger
- Degreasing dish soap
- Baking soda
- Vinegar
- Enzyme drain cleaner
- Plumber referral 303-946-2760
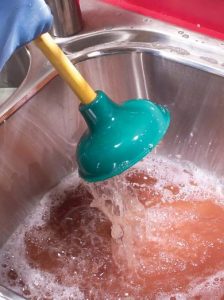 Step 1 – Plunge It
The simplest method in trying to speed up a slow drain is simply to plunge it. You will need to have a little bit of water in the sink in order for this to work. Any type of plunger will work, and sink plungers are available at most hardware stores. A sink plunger is slightly smaller than a toilet plunger, and will be easier to work with. Plunging may not remove a clog that causes a slow drain completely, but it can dislodge it, making it easier to deal with when using other methods.
Step 2 – Use Dish Soap
If the plunger didn’t work, you can try to use a dish washing detergent that has a degreaser in the formula. You will need to use quite a bit of this, at least 24 ounces. Prepare a gallon of hot water, and flush the drain with the water slowly. The degreasing agent will help to break down buildup that can cause a slow drain, and the hot water will help to flush away the build up.
Step 3 – Homemade Drain Cleaner
You can easily make a drain cleaner with baking soda and vinegar. Pour 1/2 cup baking soda down the drain first. Then pour 1 cup of vinegar into the drain. Allow this mixture to sit for about 10 minutes, then flush this with 1 gallon of boiling water. Be careful when using boiling water on a slow drain. Pour slowly so the water doesn’t splash out of the drain.
Step 4 – Use an Enzyme Active Drain Cleaner
If the above steps have failed, wait a day or two and try a commercial drain cleaner that uses an enzyme to eat away at any residue that may be causing a slow drain. The enzymes can take as long as 24 hours to work completely, so be sure you won’t need to use the drain for at least a day. After the sitting period is over, you will simply flush the enzyme with water.
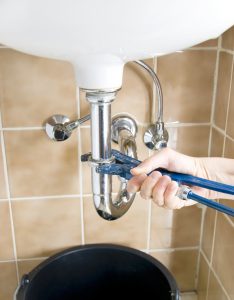
Step 5 – Check the Trap
Hair and other debris can get stuck in the U shaped pipe under a sink. Removing this trap is easy. Place a bucket under the trap before you take it apart. This will catch anything stuck in the drain and prevent water from getting all over the place. Use a wrench to loosen the metal slip nuts. Then, you can remove them by hand. Once the nuts are off, you can remove the trap. Clean the trap out, and reinstall the trap.
We recommend these tools:
![]()
![]()
![]()
![]()
Step 6 – Call a Plumber
If none of these methods have worked, it may be time to call us. Slow drains can be caused by problems that are not easily fixable for the average person. Blockages further down the drain line can typically not be fixed by the do-it-yourselfer without plumbing experience.
Questions and Answers
Send me your question and we will post it if you like the answer. Free!
Q. What should the water pressure be in my home?
A. 40 to 60 pounds is “normal.” Over 80 is too high and will cause problems with your plumbing fixtures and water heater. You can buy an inexpensive test gauge that attaches to an outside faucet. Just be sure to run the water a bit before hooking it up so you do not get a false reading from air trapped in the gauge.
Q. My pipe leading to my outside water spigot has split open in my basement. Do I have to replace the pipe or can I get some type of coupler to go over the split and seal it up?
A. If the frost-free type are 10″ long or more and the washer that actually shuts the water off is on the end inside the house, you will have to replace the whole faucet assembly. If it is just a pipe, you will have to put in a new piece of pipe. Where the pipe split will be thinner metal and will probably leak no matter how you try to patch it.
Q. Can a plunger be used to remove debris from a bathtub drain?
A. A plunger is an easy and inexpensive way to remove bathtub drain debris. A plunger creates a vacuum using suction that pushes and pulls water to loosen and remove debris.
Q. What would cause a foul odor to come up from the bathroom sink when I turn the water on?
A. Check your p-trap under the sink to make sure it is installed correctly. A crooked or improper configuration could allow sewer gas to escape into your home. Another common cause of smelly water is anaerobic bacteria that exist in some water and react with the anodes that come with most water heaters to produce hydrogen sulfide gas, making the classic rotten egg odor. The problem is most common in well systems, either private or municipal.
7 Advantages to Using Copper Plumbing Fittings
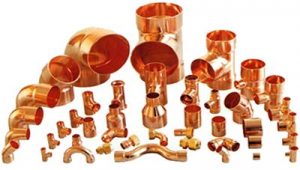 For many homeowners, copper plumbing fittings are the preferred choice. They have a long history in office buildings, public installations and homes. This has helped build the trust they command over other materials. Below are 7 advantages to using copper fittings for plumbing works.
Competitively Priced
Copper is one of the most affordable materials used in plumbing fittings. It compares favorably with other materials on the market and delivers high quality. The choice of copper in plumbing installations often adds significantly to the resale value of homes.
Reliability
The guaranteed high quality of copper fittings enhances the performance of any plumbing system. Copper is one of the few materials that ensures a problem-free performance. Copper fittings hardly require any maintenance once installed. Yet, they have a proven high-performance rating.
Durable
Copper fittings are the most durable on the market. Copper is resistant to UV rays and also resists corrosion. These are some of the most common causes of wearing away of plumbing fittings. Copper fittings are unaffected by frequent temperature and pressure variations. This subjects fittings to less wear and tear. Leaks are rare where copper fittings are used. Copper does not rust, nor will it get punctures. Since copper does not become brittle with time, fittings will not experience cracks. When properly fitted, copper fittings require no maintenance. It is rare for fittings to get disjointed or break down. Most copper fittings will last for up to 50 years and beyond.
Versatility
Copper is much softer than other metals, and easy to work with. This makes it ideal for use in plumbing works. The malleability of copper makes it easy to bend and join during installations. This reduces the need for fasteners, thus easing hardware costs. It also reduces overall installation costs. It is a lot easier to fit copper tubings into narrow spaces, which enables efficient installation. Copper tubing is available in various diameters that fit whatever application you have. Copper’s high durability allows it to be embedded in various materials, including concrete.
Fire Resistant
Should a fire occur, copper fittings will not burn, melt or smoke. Many other fittings that cannot withstand fire release toxic gases during fires. Copper fittings can save you and your family from fatal injuries and suffocation in the event of a fire. They also restrict the house damage that a fire causes.
Safety
Copper fittings are lead free. This does not pose a health risk, unlike galvanized pipes. With copper plumbing fittings you are assured of clean and hygienic water supply. The biostatic and impermeable properties of copper prevents bacteria from growing in fittings. Contaminants are effectively kept out of the water supply system.
Recyclable
Copper is an environmentally friendly material for use in plumbing works. Recyclability is up to 100 percent. Copper fittings also last several decades and hardly require replacement. They are an excellent choice where green alternatives are preferred. Use of copper fittings supports sustainable environmental management.
